FS2002 Scenery Clinic |
Installing 3rd party
scenery to FS2002 is not difficult. Providing it's installed & activated correctly you should have no problems. Then if there's any conflict the offending area can be easily deleted from the FS2002 Scenery Library. |
The basic
principle for installing & activating imported scenery is the same for
all MS sims. FS2002 uses the FS2000-style Scenery Library also featured in CFS2. It can be accessed from Settings/Scenery Library on the start-up screen or World/Scenery Library from the menu bar. |
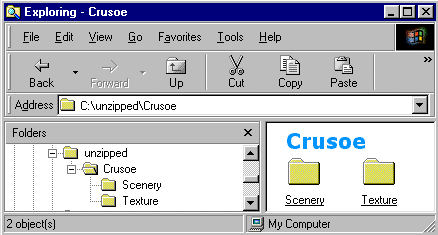
First - make sure the files are configured correctly. Most scenery comes ready-configured for install but there is always the exception. The new area should be in a suitably named parent folder with Scenery & Texture subfolders. BGL files in Scenery & texture files in Texture.
|
If you're not used to installing scenery please read the paragraphs on Sorting Scenery Files in my CFS2 Scenery Clinic The para on Flatten & Exclude Switches will also be useful. |
INSTALLING SCENERY The easiest method
for installing all imported scenery to FS2002 is to paste the parent folder
(containing Scenery & Texture subfolders) into the FS2002\ADDON
SCENERY folder. Providing
it's configured as shown above, 3rd party scenery can be activated from
any location & any drive on your PC. |
ACTIVATING SCENERY To activate the scenery,
run the sim & click SETTINGS/Scenery Library. Click the Add area
button. |
TROUBLESHOOTING
|
AFCAD The updates might be in text (.txt) or BGL (.bgl) format. To install them please follow the author's instructions in the Readme file with the download. To update the FS2002
database with the AFCAD text files you will need AFCAD |
If you have problems please Mail
me
© Grumpy's Lair 2004