REPAINTING FS AIRCRAFT

Introduction
What do I need?
FS Texture Formats
Texture Converters
Getting Started


INTRODUCTION

Repainting an aircraft is often an ideal way to start in this hobby. I am no artist or expert at repainting. There are plenty of excellent repainting tutorials posted all over the Web written by far more talented people than me. However, these tutes often assume that you know the basics. The different FS texture formats alone confuse many beginners. The purpose of this article is to explain what you need to know to give you at least a chance of success.

Most designers use expensive commercial graphics editors & paint programs.
I use Paint Shop Pro myself but there are excellent alternatives.
Being a strong advocate of Freeware I've used all free programs & utilities in this article.

Repainting textures is fine for your own use. If you intend posting your work for others to use, please ask the designer's permission first. Some will refuse but most will happily agree & even offer to help.

What do I need?
Paint Program
You can use MS Paint which I find limited & confusing. There are various free paint programs available. I've tried most of them & the best one I've found for this purpose is Pixia.

Utilities
With so many different FS texture formats used in the various MS sims a good Texture Converter utility is essential. Martin Wright is the foremost FS graphics expert.
His ConvR8 & DXTBmp utilities, plus a suitable paint program, are all you should need to repaint aircraft for any MS sim.


FS Texture Formats
MS Sim Default texture Comments 3rd Party Design Program 3rd party Texture Format
FS98 R8 RAW image format Flight Shop/AF99 AF (Same as R8)
CFS1 BMP Standard Windows 8 bit BMP Flight Shop/AF99 AF or BMP
FS2000 16 bit Extended BMP Extended BMP format introduced AF99/FS Design Studio AF or BMP
CFS2 DXT1 extended BMP DXT compressed format introduced AF99/FS Design Studio AF or BMP
FS2002 DXT1 & DXT3 BMP DXT3 format introduced for chrome effects AF99/FS Design Studio/GMAX AF or BMP

Texture Converters

FS98 Most imported FS98/CFS1 textures are in AF format. These cannnot be opened directly with a normal graphics editor & you will need a texture converter to edit them.

CFS1 The default textures can be edited & saved in most paint programs. Most imported CFS1 textures are in AF format. Later CFS1 aircraft have been modified to use the standard 8 bit Windows BMP format. ConvR8 is the ideal utility for both.

FS2000/CFS2/FS2002 While these sims can read AF & standard 8 bit Windows BMP format the increased texture sizes often make this impractical. DXTBmp is all you need for working with the various default formats & 3rd party high resolution textures.


Getting Started

First download Pixia & Pixia Help here
Also check out the links to tutorials on various subjects. Leave the extras for now.
You can download them later if you like the program.

To follow my walkthrough you need ConvR8 & DXTBmp here
Don't forget the latest mwgfx.dll which only needs installing once.

Install Pixia, ConvR8 & DXTBmp.


Most of MW's excellent graphics utilities work on the same principle. Before using any new program or utility get into the habit of reading the instructions carefully. make sure you understand how they work & set the Preferences accordingly.

The MW utilities are very simple to set up. They work in conjunction with your paint program.
To get the best out of them you must set the Preferences correctly.
I'll use Pixia in this example but they work equally well with MS Paint & most popular paint programs.

ConvR8

Use for converting R8 & AF textures.

ConvR8 installs by default to the C:\Graphics folder. To run it find the convr8.exe icon & double click on it.
I recommend creating a Shortcut to convr8.exe & pasting it to your Desktop.

To set the preferences click Edit/Select Editor to change the default editor to Pixia.

Pixia installs by default to C:\Program Files\Tacmi\Pixia. Find pixia.exe & select it.

Click Open. ConvR8 is set up to use Pixia for editing textures.


Now you're ready to start. Before going any further please take a backup copy of files you intend editing. Here's the quickest method I know. Right-click the file/folder & select Copy. Then right-click in a clear space in the same window & select Paste. Using the texture folder of the FS98 default C182 as an example you should now have a backup copy of the texture folder named, logically enough, Copy of texture.


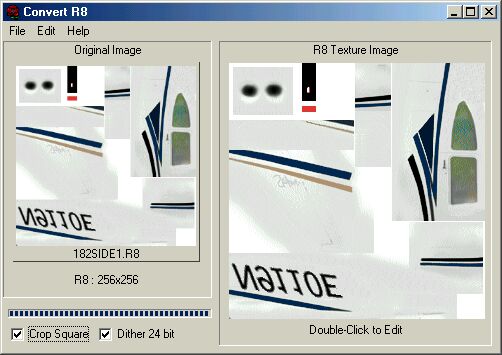
Back in ConvR8 click File/Load New Image. Navigate to the texture folder of the plane you're repainting, select a texture & click Open. Here's 182SIDE1.R8 from the FS98 default C182.

Remember, R8 & AF are the same basic format with a different file extension.


Double-click the image in the R8 Texture Image window to send it to Pixia for editing.
Part 2 Not finished yet.........more to follow

© Grumpy's Lair 2002