A
'Wake' up Call Page 4 |
Plotting the Defenders’
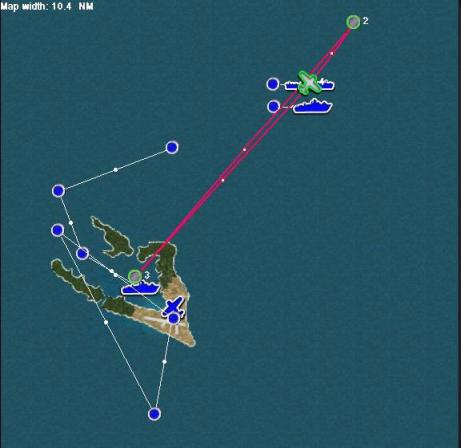
Waypoints Zoom out a couple of clicks until your plane comes into view. Drag your plane over to the fleet and place it on top of the carrier. Zoom back in to the level you were at before. For your plane select the following parameters: ‘F4U1-A Corsair’, ‘USA’, ‘Fighter sweep’, ‘Agate’, ‘Guns only’, ‘3’, ‘Fingertip’, ‘Veteran’, ‘High’. Remember that this is the skill and aggressiveness level of your wingmen. You determine your own skill levels. Right click on
your plane icon and a pop-up window will appear. Click on ‘Insert’
and create waypoint #2. Drag waypoint #2 in the direction
of the incoming first wave, about a mile and a half from the carrier.
Insert a third waypoint and place it over the lagoon at Wake Island,
then insert a fourth waypoint and place it back over the carrier. Click
on your plane icon and go to the Route Tab. For ‘Action’ select ‘Take
off’. When you do so ‘Carrier: “CV-9” should appear in the ‘Base’ window.
The default speeds and altitudes for the remaining waypoints will be
fine. The American waypoints should look something like the illustration
below. |
 |
That completes the meat of the mission. We still need
to set our triggers and events which will control some of the action
and the ending of the mission but, we are far enough along that you
can test fly the mission and look for bugs.
Click the ‘FLY NOW!’ button. This brings up a screen allowing you to save your mission. Title the mission A “Wake” Up Call. This is the name that will appear in the Missions menu in the game. Make the file name anything you’d like. This is the name the file is stored under in the MISSIONS folder of CFS2. After you have saved the mission go flying. You are testing to insure that the Japanese planes spawn and approach
their targets properly and that your wingmen and the defenders on
the island do the same. As we discussed in Part 2, you may want to
set your plane to ‘invincible’ to avoid being shot down during the
testing phase. There is no trigger to end the mission, so after you
have flown for a while and are satisfied that everything is OK or
you’ve identified areas that need to be adjusted, press ESC and end
the mission. |
|
If you’ve followed the instructions carefully up to this point the mission should have run smoothly. You will notice that the first wave of planes approaches the carrier almost simultaneously. The second wave is a little more spread out as they attack the island. That is fine as the spacing is more challenging and keeps you and your wingmen busy. You may need to move the two flights of Japanese planes either closer to or farther from their targets until you get the timing just right. Remember that you can measure distance in the game by left clicking on an open area and dragging your cursor. A yellow line will appear and the length of the line will be displayed in the left-hand panel near the bottom. Once you are satisfied with the flow of the mission we’ll move on. If you had a problem with the flights of bombers colliding with one another you will need to make some adjustments. You shouldn’t have problems with different kinds of planes colliding because we varied the altitudes of the different models. If one flight of the same type of plane flies into each other, for example if the Vals keep colliding, this is a problem within the game and can’t be fixed when selecting multiple numbers of planes in the same flight. One solution to that problem is to plot three individual Val dive-bombers instead of one group of three planes. I have had luck when doing this. You need to carefully plot the routes so that there is spacing between the planes, but I have found this an effective way to avoid the collisions that sometimes occur with multi-plane flights. It is more time consuming however. On the other hand, it does offer another advantage over the multi-plane flight. You can have each plane attack a different target. I have also found that when doing this I get better bombing accuracy than when having an entire flight aim for one target such as we are doing in this mission. |
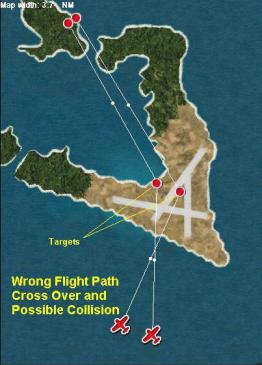
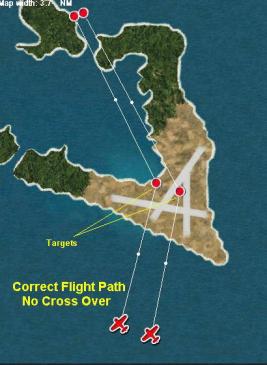
Another cause of mid-air collisions occurs when you have your flight paths crossing one another. If your two flights of Bettys attacking Wake are colliding this could be the problem. As you look down on the mission map we have one flight of Bettys striking the B-25’s and the other flight striking the Tanker ship.
If the flight on
the right goes after the tanker and the flight on the left attacks
the B-25’s they must crisscross in route and
that can cause a collision. Keep this in mind when plotting your waypoints
and have each flight stay in its own ‘lane’ so to speak. |
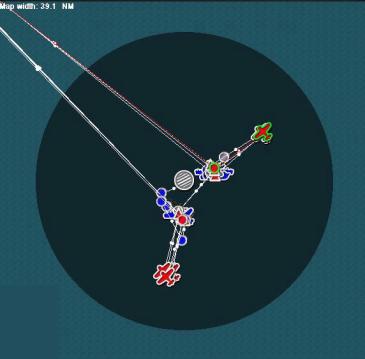
Setting the Event Area We will now place a second Event Area directly on top of the first one. Click the ‘New event area’ button and place your cursor right in the center of the first event area icon. Drag this new event area out to a radius of 16 miles. If you are off center, you can click the ‘Undo’ button along the bottom and try again. You can also zoom in to exactly place the second event area on top of the first. When you are finished, name this new area ‘Outer zone’; set the ‘Radius’ to ’16.00’ NT and click ‘Apply’. Finally, zoom out one more click. Drag the ‘Waypoint #3’ markers for each flight of bombers to a point well away from the combat area. One of my pet peeves in CFS2 is the behavior of the bombers after they have dropped their bombs. Historically, when a flight of bombers finished their bomb run they headed for home and let the fighter escorts deal with the attacking defenders. You may have noticed that in CFS2 some of the bombers break formation and behave like fighters themselves. The Bettys are bad at this. I believe it helps to set your final waypoints well away from the combat area to help prevent this. It won’t stop it but it does ‘encourage’ the bombers to keep moving. If you set your final waypoint too close to the action, when the enemy planes get there they will begin milling around looking for a place to land. It is more realistic to set that last waypoint well away from where the action is taking place when dealing with bombing missions. |
Completed Combat Area |
Completed Mission Map |
| Back |


