A
'Wake' up Call Page 2 |
|
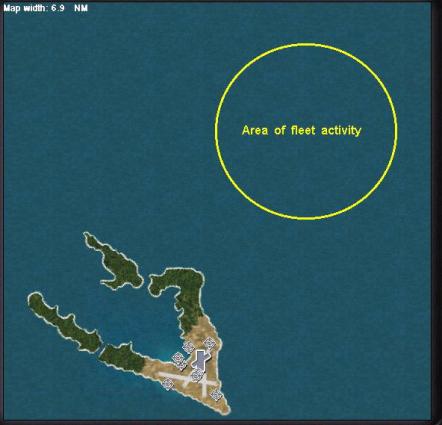
I’ve marked on this map the area we are going to focus on now, about 6 miles NE of Wake. Placing
the Fleet |
| Now select another
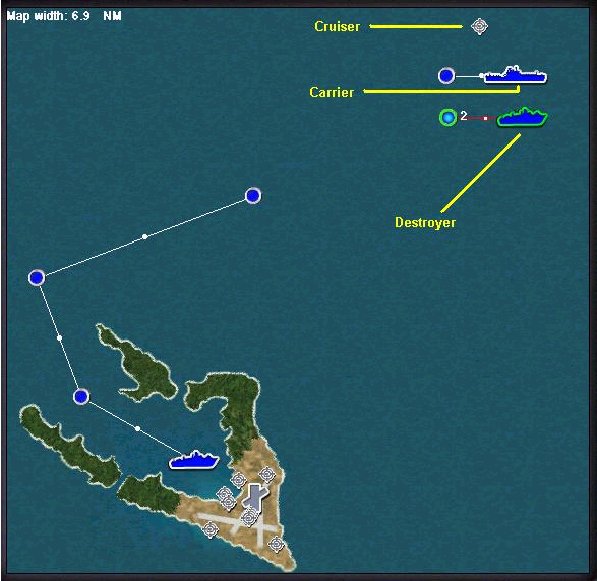
new ship. This time make it a ‘USS Mahan class Destroyer’. The default
nationality should already be ‘USA’, leave the other defaults as is.
Place this ship next to the Essex and plot waypoint #2 as you did with
the carrier.
Next click ‘New infrastructure’ and choose ‘Ship’. As the ‘Class’ choose a ‘USS Portland class Cruiser’ and set the orientation to 270°. Leave the ‘Goal’ as ‘None’. Place this cruiser next to the other two ships. We now have three ships, two moving, one stationary, located in the ocean a few miles Northeast of Wake. Before we fine-tune them, we’ll add one more ship. Click the ‘New ship’ button again. Select another ‘USS Mahan class Destroyer’. Double check that the nationality is USA and set the ‘Goal’ to ‘Must survive’; the remaining default settings will be fine. Place this ship near the bottom of the ‘V’ formed by Wake Island. Drag waypoint #2 to the mouth of the ‘V’. Then set waypoint #3 a little to the Northwest and finally set waypoint # 4 about midway between waypoint #3 and the fleet. Refer to the illustration for assistance. |
We now need to fine-tune the waypoints and locations of our ships. Since we are working on the second destroyer we will start there. Highlight the second destroyer and click on the ‘Route’ tab on the left side of the screen. If you clicked on the destroyer to highlight it then you will be sitting on waypoint #1. If you are on any other waypoint, click the left arrow to get to waypoint #1. Under
‘Action’ notice that you have two choices, ‘Turn’ or ‘Do not evade’.
|
|
|
You may have heard, or experienced, the fact that ships in CFS2 sometimes ‘sail’ overland. There is a bug in the game that will, under certain circumstances, cause a ship to travel over land as though it was on water. We would like to prevent that from happening if possible. Set your action to ‘Do not evade’. There is no guarantee that this will keep your ship from turning into the island but it should help. Set the speed at waypoint #1 to 3 knots. Move to waypoint #2 by clicking the right pointing arrow or on the waypoint marker. Keep the action as ‘Do not evade’ and up the speed to 8 knots. At waypoint #3, set it to ‘Do not evade’ and 12 knots and at waypoint #4, the defaults of ‘Turn’ and 16 knots will be fine. Visualize what we’ve created here and you will see that when the attack begins this destroyer is stationary in the lagoon. She needs to get up to speed, which takes a while, and negotiate the narrow entrance of the lagoon to get out to assist the fleet. Now, zoom in on the fleet. If you set the ships close, you should be able to get all three in the frame at the 1.7-mile width setting. Adjust the positions of all three ships until they are about a half a mile apart. I set mine with the destroyer farthest South and the cruiser farthest North. For both the destroyer and the carrier set the ‘Action’ at waypoint #1 to ‘Do not evade’ and at waypoint #2 to ‘Turn’. Set the speeds as 1 knot at waypoint #1 and 5 knots at waypoint #2 for both. You don’t need to do anything with the cruiser, as it is stationary infrastructure and not a moving vessel. With all four ships in place and the waypoints plotted your map should look something like the illustration on the previous page. |
Plotting the Enemy Attack |
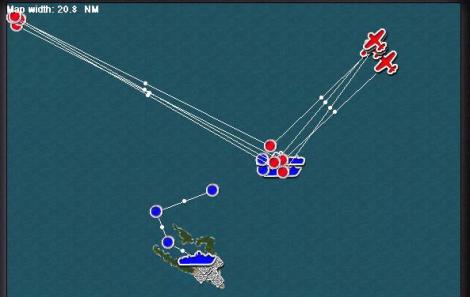
Zoom out a couple of clicks to around the 20-mile width. Click on the ‘New aircraft’ button. From the drop down menu select the ‘B5N2 Kate’. Set the ‘Nationality’ to ‘Japan’, the ‘Mission’ to ‘Anti-ship’, ‘Unit ID’ to ‘Abe’, ‘Payload’ to ‘Torpedo’, ‘# of aircraft’ to ‘3’, ‘Formation’ to ‘Fingertip’, ‘Skill’ to ‘Veteran’, ‘Aggressiveness’ to ‘Average’ and the ‘Goal’ to ‘None’. See the illustration to the right. Place the first waypoint for this flight about 5 miles Northeast of
the carrier. Drag the second waypoint and place it on top of the carrier.
Drag the third waypoint to the upper left-hand corner of the map. Now,
click the ‘New aircraft’ button again. You will keep the same parameters
as before. Everything will be filled in for you but you must reset
the payload to ‘Torpedo’. Place a second flight of Kates along the
same flight path, changing only the second waypoint. This time place
the second waypoint on top of the cruiser. Click the ‘New aircraft’
button again and create a third flight of Kates. Make the Unit ID for
this flight ‘Otani’, set the payload to torpedoes and lay it’s course
directly on top of the first flight, again targeting the carrier. Click
on ‘New aircraft’ and this time select the ‘D3A1 Val’. Set the payload
to ‘Bombs Heavy’. Place the Vals along the same flight path as the
Kates but target the destroyer as your second waypoint. You have now
roughly plotted three waves of torpedo bombers and one wave of dive-bombers
attacking the fleet. Now lets give them a fighter escort.
|
|

Click the ‘New aircraft’ button once more. Select the ‘A6M2 Zero’ as the plane and ‘Intercept’ as the mission type. If you have followed this sequence, the remaining information will be the same parameters as we used for the bombers. The
payload will have defaulted back to ‘Guns only’ which is correct
for the Zeros. Place these Zeros along the same flight path as the
bombers with the second waypoint set anywhere in the cluster of ships.
Your map should look something like this illustration.
We now need to fine-tune the waypoints for this attack force. There are several ways to do this. I’ll try to show you a method that minimizes the amount of zooming in and out you will need to do |
Start by separating the five airplane icons at waypoint #1 so that you can easily tell one from another. When you have them separated, highlight the first flight of Kates, the flight attacking the carrier with the unit ID of ‘Abe’, and go to the ‘Route’ tab. If you are not on waypoint #1, use the left and right arrows to get there. Set the ‘Altitude’ to ‘500’ feet. The default action of ‘Turn’ is correct. Click the right arrow and go to waypoint #2. Here, set the ‘Action’ to ‘Attack w/torpedoes’ and the altitude to 500 feet. The ‘Target’ may show as ‘Current point’, that’s OK for now, we will fine-tune that later. Go to waypoint #3 and set the altitude at 3000 feet. Highlight the second and third flight of Kates. Following the steps above set the parameters the same as the first flight with the altitude at 500 feet for both waypoints one and two, 3000 feet at waypoint #3 and the action at waypoint two as ‘Attack w/torpedoes’. Highlight the flight of Vals. As dive-bombers we need to adjust their altitude some. Set their altitude as 1500 feet for waypoints one and two and 3000 feet for waypoint #3. Then, set their airspeed to ‘157’ knots at waypoint #1 to match the speed of the Kates. Set the action as ‘Attack w/bombs’ at waypoint #2. Finally highlight the Zeros. Set their altitude as 2000 feet at waypoints one and two and 3000 feet at waypoint #3. Set the action at waypoint #2 to ‘Intercept all’ and, as with the Vals, reduce their speed at waypoint #1 to 157 knots. We want all of the planes to arrive at waypoint #2 at about the same time so we need to adjust the speeds to match that of the slowest plane in our group, the Kates in this case. We could set the speeds the same at waypoint #2 also but I have chosen not to do that. This method will create some spacing as they approach waypoint #2 and the speeds of the Vals and Zeros pick up. The Zeros should get there slightly ahead of the bombers to engage our planes. You have now set the altitudes and actions for the first wave of enemy bombers. We next need to zero in on each waypoint to tighten up the formations and specify the targets. First, place all of the plane icons on top of each other at waypoint #1 then zoom in about 5 clicks to around the half-mile width. Set the five flights so that they are reasonably close to each other. Remember there is spacing in altitude between the different types of planes. You must be most careful of the three flights of Kates. If you place them too close together they may collide with each other before reaching the target. However, in this case one flight of Kates will not appear with the others. Place the icon for the ‘Otani’ flight anywhere in line with the ‘Abe’ flight. See the illustration for how I set up my flight. I have the flights of Kates set about 1000 feet apart (2/10’s of a mile). |