A
'Wake' up Call Page 3 |
|
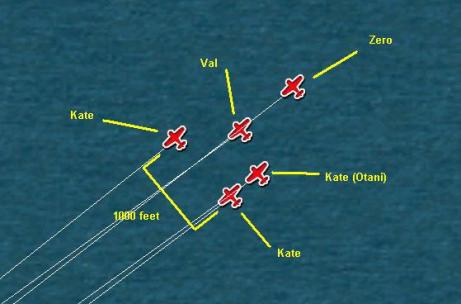
Now let’s fine-tune waypoint #2 and the targets. Click on any of the plane icons then go to the ‘Route’ tab and click on the right and left arrows to get to waypoint #2. You may need to zoom out a couple of clicks so that you get all three ships in frame. You should be able to see the waypoints for all five flights of planes although they will probably be scattered around. The four waypoint icons that look like triangles are our bombers. As you pass your cursor over each one, the unit ID for that flight will appear. Find the waypoint for the first flight of Kates (Abe). Drag the waypoint and place it directly on top of the carrier. When you have done that correctly the ‘Target’ on the route tab will change to “Essex CV-9”. |
|
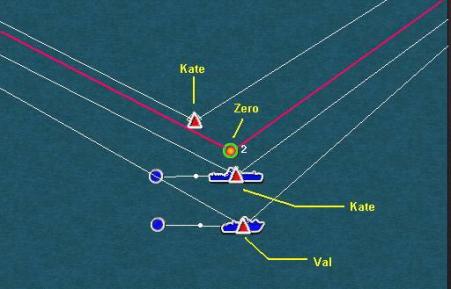
Now set the waypoint for the ‘Otani’ flight of Kates directly on top of the ‘Abe’ flight, targeting the carrier again. Then set the waypoint for the third flight of Kates on the cruiser and for the Vals on the destroyer. If you are having trouble getting the target to change to the ship, zoom in closer so that you can move the waypoint more accurately. After you have targeted all three ships, set the Zero’s waypoint somewhere in the middle. Good job! We will
leave waypoint #3 alone for the time being. Zoom out to around the
13 to15-mile map width and center Wake Island in
the map window. Following the same technique we used to plot the first
attack wave we are now |
First wave - Waypoint #2 plotted |
|
Click on ‘New aircraft’ and select the ‘G4M2 Betty’. If you have been following along, the nationality, number of planes, formation, skill, aggressiveness and goal will all match those of the other Japanese planes we selected. You will need to set the ‘Mission’ to ‘Strike’ and the ‘Payload’ to ‘Bombs Heavy’. VERY IMPORTANT - set the ‘Start delay’ to 00:03. This will delay the appearance of these planes for three minutes. In other words, the game will run for three minutes before these bombers appear and begin their attack. Note: The ‘Start delay’ is computed in minutes whereas the ‘Action delay’ in Events is computed in seconds. |
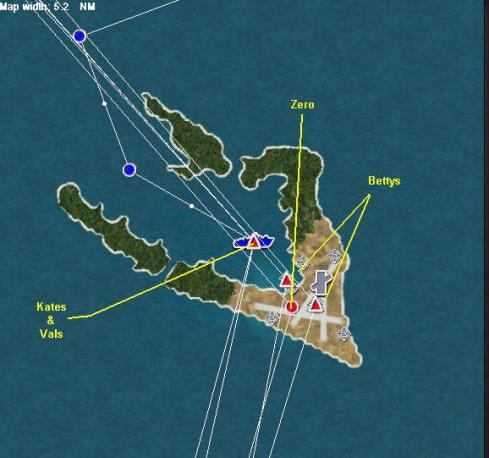
We will have this wave of bombers attack Wake from the South. Place the first waypoint about 5 miles South of the island. Place waypoint #2 on top of the island and waypoint #3 off toward the Northwest as we did with the first wave. When you have plotted this first flight of Bettys, click on ‘New aircraft’ and create a second set of Betty bombers. Use all of the same parameters and don’t forget to set the start delay to 00:03. Set the waypoints for this flight the same as you did the first set of Bettys. After both sets of Bettys are plotted, click on ‘New aircraft’ and create a flight of Vals. Set the mission as ‘Anti-ship’ and the payload as ‘Bombs Heavy’. Follow the same flight path as the Bettys then set up two flights of Kates. Set the mission to ‘Anti-ship’ and the payload as ‘Torpedo’. Set the same flight path as before. Be sure to set the delay for both the Vals and Kates to 00:03. For one flight of Kates, select the Unit ID ‘Suzuki’. Remember it, you will need it later. Finally create a flight of Zeros to escort this group of bombers. The mission will be ‘Intercept’, the payload will be ‘Guns only’, and the delay will be 3 minutes. You should now have six flights approaching Wake Island from the South and leaving to the Northwest. See the illustration for how your mission should look up to this point. |
|
Just as with the first flight we need to fine-tune the waypoints for this attack. Zoom in on the cluster of planes at waypoint number one. Using the same technique that we used with the first flight, position the second wave of bombers. Set the altitude of the Bettys to 2500 feet, the altitude of the Vals at 1500 feet, the Kates at 500 feet and the Zeros at 2000 feet. Reduce the speed of the Zeros and the Vals to 160 knots. The speed of the other planes will be fine as is. Set the icon for the ‘Suzuki’ flight with the other flight of Kates.
|
After you have all six sets of planes positioned properly, highlight any one of the planes and go to waypoint #2 on the route tab. Set your second
waypoints and targets as follows. For the first group of Bettys
set the ‘Action’ as ‘Attack w/bombs’ and the target as any one
of the B25’s. Remember to move the waypoint around until the target
shows ‘B-25D Mitchell’. Set the altitude to 2500 feet. For the
second set of Bettys the action will again be ‘Attack w/bombs’
and the target will be ‘USS Tanker Ship’. Set the altitude to 2500
feet. For the Vals the action is ‘Attack w/bombs’ and the target
is “DD-722” (the destroyer). Set the altitude to 1500 feet. For
both flights of Kates the action is ‘Attack ‘w/torpedoes’, the
target is again the ‘DD-722’ and the altitude is 500 feet. Finally
place the Zero’s waypoint #2 anywhere over |
|
Finish off the second wave by highlighting any plane and clicking on waypoint #3 on the route tab. Set the altitude for all six flights to 3000 feet at waypoint #3. Zoom back out to around the 20-mile width and take a look. As you
can see, there is a lot happening in our mission area and we haven’t
even begun to plot any of the defender’s planes yet, including our
own.
|
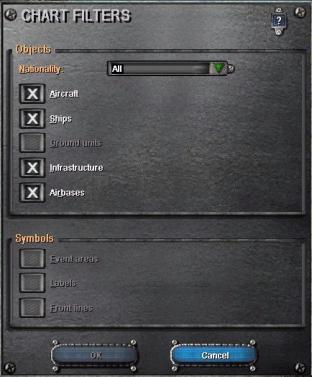
When you start to write more complex missions with lots of planes, ships and infrastructure the map begins to get cluttered. To make it easier to see what you are doing you can apply filters to remove some of the clutter. Click the ‘Chart filters’ button along the bottom of the map. It is the button that looks like two overlapping circles with dots in them. That will bring up the window shown here. |
Each item shown with an ‘X’
is a type of item in use in our mission. The shaded boxes are things
that we are not using. You will note that we are using ‘Infrastructure’
in this mission but not ‘Front lines’ for example. We can use the filter
feature to remove from view those items or objects that are cluttering
up the map. This allows us to see more clearly what we are doing without
having a whole lot of ‘extras’ around. To filter out an item click
the ‘X’ to remove it. You can also selectively remove one nationality’s
items rather then all of the items of that type. Click on the ‘Aircraft’,
‘Infrastructure’ and ‘Airfields’ boxes then click ‘OK’. That will remove
all of the planes we have added so far and the infrastructure around
the base along with the cruiser and tanker ships which, you’ll recall,
were added as infrastructure and not moving ships, and the big gray
‘X’ marking the airfield. |
|
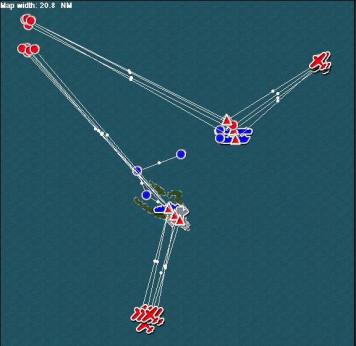
Map before filtering |
Map after filtering |
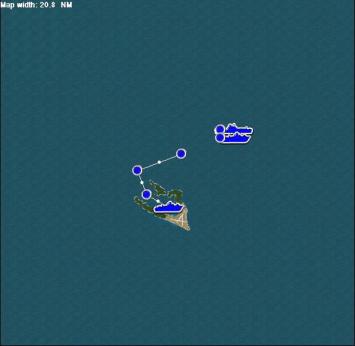
| Isn’t that better? You didn’t ‘Delete’ anything. You are merely hiding some of the objects we added to make it easier to work. Now let’s set up our defenders. |
| Back |