Adding Triggers and Events to our Mission It helps to first decide what events you want to occur in your mission and then build the triggers to support those events. Our mission is a very simple one. We want these events to occur: 1. warp to waypoint #2 |
We have six events so
we need six triggers right? Not quite. Mission Builder is set up
so that you can always perform the first warp so we don’t have to
create a trigger for that one. Also, when you get to the last waypoint
you can end the mission by pressing “X”. These automatic warps and
mission ending assume that there are no enemy targets in the area.
On missions where you start by taking off, you must first achieve
a minimum altitude and air speed before the warp will be enabled.
So, while we have six events we only need to create 4 triggers to
get the mission to work. Let’s take them in order. |
|
The first event we want to trigger is spawning the Zeros. Start by clicking the ‘Triggers’ button on the left side of the screen along the top then click ‘New’. Give the trigger a name. “Spawning Zeros” is NOT the right name. That is a good name for the event, not the trigger. We’ll call this trigger “Player arrives at WP #2”. Under ‘Object’ the default category is ‘Aircraft’ and the player aircraft is already selected. Under ‘Trigger Parameter’ choose ‘Type’ - ‘Status’, ‘Param’ - ‘Waypoint Reached’, ‘Operator’ - ‘Equals’, ‘Value’ - ‘+2’.
|
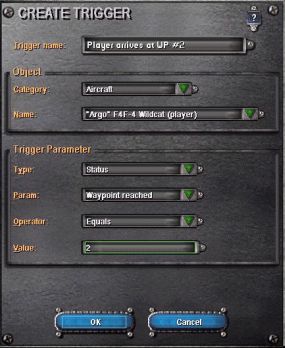
Look it over
and you’ll see the trigger we’ve created is our arriving at waypoint
#2. |
Name the event "Spawn enemy Planes". You will see a window with a list of your triggers for this mission. Right now there is only the one we just created. Highlight it then click on the right arrows to insert it into the right hand column. Drop down on the left-hand side to where it says ‘Action’. Click the down arrow and select ‘spawning’. This gives you two options, ‘Re-spawn unit’ and ‘Spawn unit’. Highlight ‘Spawn unit’. In the window to the right ‘Honda’ will show as the default. Click the double right hand arrows (>>) then click ‘OK’.
|

What you’ve just done is created a trigger and an event that combined will cause the two Zeros to appear when you arrive at waypoint #2. Easy wasn’t it? Now lets do the next three
triggers and events |
Open the triggers and click
on ‘New’. Title this trigger “Enemy planes destroyed”. Save it
and open up a new event.
Name this event “Enable warp 1”. Next select ‘miscellaneous’
under ‘Action type’ and select ‘enable warp’. |
The next trigger will be similar to the first. Name this trigger “Player arrives at WP #3”. Set it up like you did the first one with the player arriving at waypoint ‘+3’. Your selections will be ‘Category - ‘Aircraft’, then select the player aircraft. Under ‘Trigger Parameter’ choose ‘Type’ - ‘Status’, ‘Param’ - ‘Waypoint Reached’, ‘Operator’ - ‘Equals’, ‘Value’ - ‘+3’. Click ‘OK’, close this trigger and open a new event. Title this event “Spawn enemy ship”. Select the new trigger you just made then, just like you did with your first event, select ‘spawning’, ‘Spawn unit’ and choose the torpedo boat. It will be found below ‘Honda’ in the drop down menu. Now we’ll create one last trigger. Title this last trigger “Enemy ship destroyed”. Select ‘Moving object’ as the category, and the torpedo boat as the name, then the following parameters: ‘Status’, ‘Object health’, ‘Equals’, ‘0’, just as you did for the planes. Close it and open a new event. Name this event “Enable warp 2”. Choose ‘Enemy ship destroyed’ as the trigger. Set an action delay of 5 seconds, then choose ‘Enable warp’ under “Miscellaneous’. Next select ‘Debrief text’ from the dropdown menu under ‘Action Type’. Highlight it and click the double arrows. Type in this text: Congratulations! You have successfully completed the first mission
you wrote. |
Do
Not check the ‘Repeat actions” box. Click ‘OK’ and save this event.
You should have created four triggers and four events as follows:
Trigger Event
Player
arrives at WP #2 …………………………………………….Spawn enemy planes
Enemy
planes destroyed ………………………………………….. Enable warp 1
Player
arrives at WP #3 …………………………………………….Spawn enemy ship
Enemy
ship destroyed ………………………………………………Enable warp 2
This
completes the meat of the mission. The only thing we have left to
do is flesh out the introductory texts. Before we do that however,
let’s see if this thing works. Click on the ‘Fly Now’ button. A popup
window will appear asking you to save your mission. Title this mission
“Beginner’s Luck”, that is the name that will appear on the missions
list. The file name is how it will be stored on the computer. Call
it anything you like, perhaps your initials and the number of the
mission. I might use CC_1 for example. Click ‘Save’ and Mission Builder
will save the mission and switch over to CFS2. Go flying then meet
me back here. |
Well,
how was it? Did you successfully complete the mission? I forgot
to tell you that those Japanese torpedo boat gunners are pretty
good shots! I hope you made it home safely. What about all that
radio chatter and the messages on your screen? Where did they come
from? A variety of canned messages and radio sounds are hard wired
into the CFS2 missions. This keeps you from having to reenter some
of those routine messages over and over again. You can add custom
radio chatter but that is beyond the scope of this first lesson.
If
you followed these steps exactly you were able to take off from
Henderson and warp to waypoint #2. After that you were on your
own. The Zeros appeared and if you shot both of them down, warp
was enabled so you could go to waypoint #3. Once there you could
dive down and strafe the torpedo boat. If you sunk her, warp was
again enabled to take you home where the mission ended.
Now
is the perfect time to tweak the mission. If the Zeros were too
close or too far away when they appeared then simply move their
waypoints on the map to fine-tune them. Do the same thing for the
ship. If either the planes or the ship failed to appear go back
to the triggers and events and compare what you typed in with these
instructions. Something doesn’t match. Once you have it just the
way you want it; we’ll finish it off.
Click
on the ‘Mission setup’ button along the top left toolbar. Here
is where you set the date, the time, the weather and type in the
text for the mission Overview, Background and Intelligence. For
this first mission we will use the default dates, times and weather.
I think it’s a worthwhile to get into the habit of writing a good
overview. Maybe right now you are only writing missions for yourself
, but you may find that you end up swapping them with friends or
even posting them on the Internet. If you do that you want good,
clear text to help the other simmers out. Remember, you know what’s
supposed to happen but nobody else does. In addition to a general
setup of the mission the overview should always tell the pilot
what they must do in order to successfully complete the mission.
Here’s a sample for this mission:
Overview: You
are flying a triangular grid, solo out of Henderson. Keep alert
and destroy any enemy targets that you encounter. The mission will
end when you have destroyed all targets of opportunity and returned
safely to base.
Background: Your
plane was recently repaired and you want to take it out for a shakedown.
You have planned a routine flight around the Henderson area.
Intelligence: Enemy
activity has been at a low point lately. You should have an uneventful
flight but watch for some Japanese patrol boat activity around
Florida Island.
Be
creative and remember to have fun with it. Also remember, there
is NO spellchecker in Mission Builder!
|
Tips,
Thoughts & Troubleshooting “Beginner’s Luck”
Hopefully
you enjoyed writing your first successful mission. You should have
found that mission building is not difficult, but it is time consuming
if you do it right and it does require that you pay attention to
detail. Anyone can slap together a shoot-em-up with you against
50 Zeros, but if you want to put together a mission that makes
sense and has a logical flow you need to give it a little advance
thought.
Know
what you want to do before you start. Depending on your personality
you may want to make an outline, jot down some random notes, or
simply visualize the entire mission in your head. Whatever works
for you is the right thing to do. I maintain that you’ll have more
success if you think the mission through before you
start Mission Builder rather than trying to make one up as you
go along.
If
the mission doesn’t behave properly it is probably due to missing
or inaccurate triggers or events, In this mission we could have
written all four triggers at once then done the events. That may
be a shortcut but it can get you confused. It’s better to take
one entire trigger/event sequence at a time until you become thoroughly
familiar with mission building. Another thing you can do is to
fly the mission after each trigger/event sequence to make sure
you have that one correct before moving on.
If
you fly the mission and did everything right and still fail then
one of your goals is incorrect. Make sure that you set goals. Determine
which planes, ships, vehicles, etc. you want to destroy as a part
of the mission and label them as such when you add them. Don’t
inadvertently have “Must survive’ as a mission goal for all of
the enemy planes or you’ll never succeed (unless you’re a terrible
shot). By the same token, every enemy plane doesn’t have to have
‘Must be destroyed’ as a goal. If you go up against two flights
of bombers and three packs of fighter escorts, that may be more
planes than one person can realistically expect to shoot down.
A plane labeled as ‘None’ under goals can either be shot down or
not and it won’t effect the mission outcome. I’ll address some
of these issues in the following segments.
Use Mission Builder to open and examine the stock missions that came with CFS2. By studying the waypoints and reading the triggers/events you can learn a lot about constructing successful missions. Do the same thing with missions you download from the Internet. Add-on missions range in quality from excellent to terrible. Fly them first then dissect them. Again, it’s a great way to learn not only the correct way but also the wrong way of writing missions. I don’t hesitate to copy add-on missions and work at fixing the bugs and tweaking them more to my liking. It goes without saying that you shouldn’t modify the stock missions (other than changing the plane to your personal favorite) without making back-up copies first. Experiment and be creative. Remember that you’re doing this for enjoyment so have fun and don’t get frustrated. In Part 2, we will build on this lesson and add to our knowledge. |
| Menu |