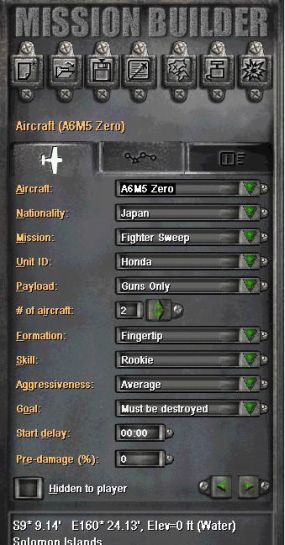
Click on the (+) button along the bottom
toolbar below the map. This will change your cursor to a magnifying
glass so that you can zoom in. Place the cursor over waypoint #2 and
click once. Now, click on the ‘New Aircraft’ button on the tool bar
above the map. This will change your cursor into an airplane. Place
the plane just above your flight path toward the left side of the map
and left click. Then drag the cursor to a point a little below and
well beyond waypoint #2. Left click again. . Finally, right click to
return your cursor to an arrow. Good, you have just added another plane
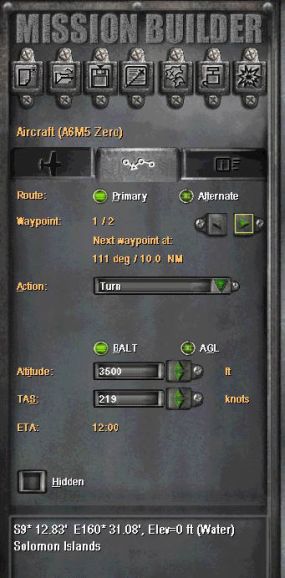
and given it two waypoints – starting and ending. As you gain proficiency, experiment with the different levels and see how it impacts the mission. Since this is your first mission and I want you to complete it successfully we’re using a fairly easy setting of ‘Rookie’ and ‘Average’. Click on the ‘Route’ tab. Make sure it is showing waypoint #1. If
not, click the left or right arrows to get there. The action will show
as ‘Turn’. Leave that as is. Drop down to the altitude and change it
to 3500 feet. We want the enemy planes and our plane to be at the same
altitude so that we can see them and engage them easier. Go to waypoint
#2 and change that altitude to 3500 feet also. Although, if you do
your job properly those Zeros will never get to waypoint #2. |
|
|
Now we need to get to your waypoint #3.
There are three ways we can do that.
Try whichever one you want, just meet me at waypoint #3. We are now going to add another target to shoot up on the way back to the base. Click on the ‘New Ship’ button along the top. Your cursor will turn into a ship silhouette. Place the first waypoint for the ship along your flight path a little in front of your plane then drag the cursor placing the second waypoint along the same line but farther out. This will give the effect of approaching the ship from the rear. Click on the ship’s starting point then go over to the left side of the screen and let’s set up this target. Scroll down, under ‘ShipType’ select ‘HIJMS Tidori class Torpedo Boat’. You can choose any vessel you want but it might be tough to sink an aircraft carrier with just guns so let’s keep it easy for this first mission. Much like with the Zeros, select the other fields, ‘Nationality’ - ‘Japan’, ‘Unit ID’ - ‘PB75’, ‘Skill’ - ‘Novice’, ‘Aggressiveness’ - ‘Average’, and ‘Goal’ - ‘Must be Destroyed’. This now means that you have four goals you must achieve to successfully complete this mission: 1. You must
survive – this is always a goal. OK, lets link everything together with some triggers and events, write up some accompanying text and go flying! |
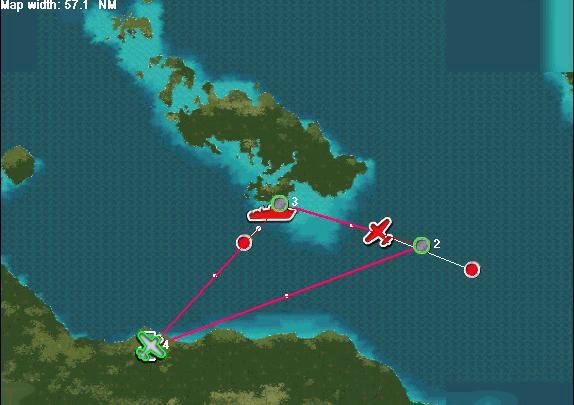
The complete mission shown plotted on the map. |
|
A Few Words about Triggers
and Events |
Triggers and events are what give life to your missions. They can be simple or complex and can cause a mission to go different directions each time it is flown. Mastering triggers and events will allow you to design more exciting and challenging missions. In this tutorial we will set up simple triggers and events. To learn more, refer to some of the missions that came with CFS2. Open them up in Mission Builder and look at the different triggers and events. See how they interact and what effect they have on the game. Finally, experiment on your own as you build experience and confidence. An event is something that happens. A trigger is the thing that causes the event to happen. An event can’t happen until it has been triggered. We have triggers and events in our daily lives only we don’t think of them in those terms. Trigger: the alarm goes off, Event: you wake up and get out of bed; Trigger: a police officer pulls you over, Event: your blood pressure rises; Trigger: you see a beautiful woman walking down the street, Event: your blood pressure rises. Notice that in the last two examples the same type of event can have different triggers. In CFS2 an event might be enabling warp, the trigger could be arriving
at a certain waypoint. Just like in the example above, the same type
of event could have two different triggers. The event may be ending
the mission. The triggers could be destroying all of the targets or
leaving the combat area. Which happens first would determine which
trigger is used. |
| Back |


