| Raid on Tarawa - Page2 |
|
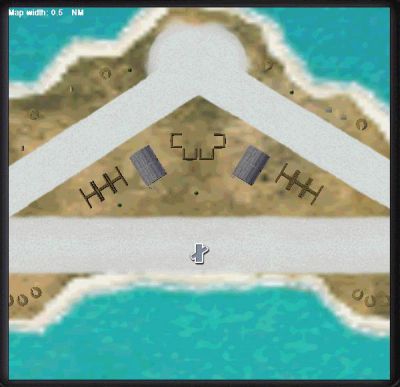
Notice that the stock airfield already
has two hangers and a number of aircraft revetments located between
the runways. We are going to use those existing revetments and add
target aircraft to them.
To make it easier to accurately place our planes, zoom in on the cluster of four revetments right in the center of the picture by changing your cursor to the plus (+) symbol and clicking twice more. Right click when you’re done. We
are now going to place four Betty bombers. These are the primary
targets for this mission. They will be stationary so click the
‘New infrastructure’ button and select ‘Aircraft’ under ‘Class’.
Scroll
down and select the ‘G4M2 Betty’. Set the goal to ‘Must be destroyed’.
Place one plane in each revetment. Right click when you’re done.
You will need to set the goal for each plane.
|
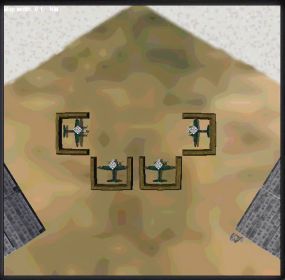
We now have one bomber in each revetment. The bottom two are facing out but the two on the sides are facing into the walls. That’s no good. We need to change the orientation on them to make them face out and look more realistic. Orientation refers to the direction the item of infrastructure is facing in relation to North. Remember that a compass has 360 degrees. North is zero degrees (also 360°). If you face due East you are facing 90°. South is 180° and West is 270°. When you place infrastructure in a mission the default orientation is always 0° - North. With the four revetments we are using, two are facing North so we don’t have a problem. With the other two we need to change the orientation. The Betty on the left needs to be facing East (90°) and the Betty on the right needs to be facing West (270°). Place your cursor on the ‘bullseye’ of the Betty on the left and left
click. This will turn the bullseye green. Go over to the infrastructure
panel and type in 90 for the orientation and hit the ‘Enter’ key. Do
the same thing for the Betty on the right, typing in 270. This is a
good time to make sure that the goal for all four bombers is set as
‘Must be destroyed’. When you’re finished the revetment area should
look like this: |
|
This is probably a good spot to talk
about adding additional infrastructure to your missions. One of the
fun aspects of Mission Builder is the ability to add extra objects
to the existing scenery. This not only makes the area look more realistic
but it gives us lots of extra targets to destroy and added antiaircraft
guns make the missions more challenging.
That’s all well and good, but be aware that for every piece of additional infrastructure you add to the game, you pay a price in reduced performance. Every extra item that the computer needs to draw on your screen slows down the game. At first the effect may not even be noticeable but if you put enough extras into your missions frame rates will suffer and the mission won’t be as much fun to fly. If
you have a super fast Pentium 9, with a 2 GHz processor and 3 GB
of SDRAM go for it. You may never notice an impact. If your system
is more vanilla, you may want to weigh the pros and cons of adding
too many extras.
|
Before adding infrastructure you might want to consider what the purpose of it is. Will it be a target? Does it add to the excitement of the mission or to the mission goals? Or, is it just there to add realism to the background? If that forest of palm trees is important to you then by all means add it to your mission. Just recognize that you make a trade off in performance as the number of planes, ships, trucks, and trees, etc. climbs. We’ve now added our main targets for this mission. Zoom out a couple
of clicks and we’ll add a few additional items of infrastructure to
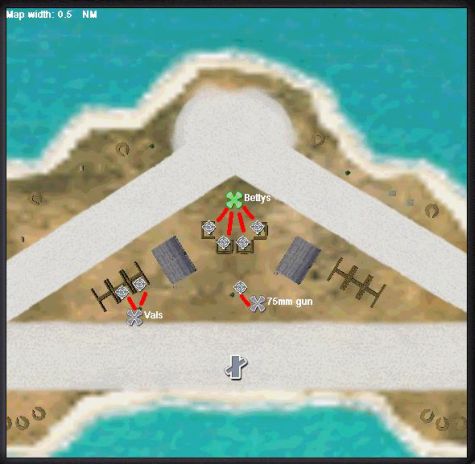
make it interesting. Following the instructions above, place two Val
dive-bombers in any of the open revetments you choose – remember to
get the orientation right. Also add a Japanese 75mm antiaircraft gun
to the area between the two hangers. The Vals will make it tougher
to pick out the correct targets and the antiaircraft gun will add an
extra challenge. Set the goal for all three items as ‘None’. When you’re
finished it will look something like this. |
|
Plotting
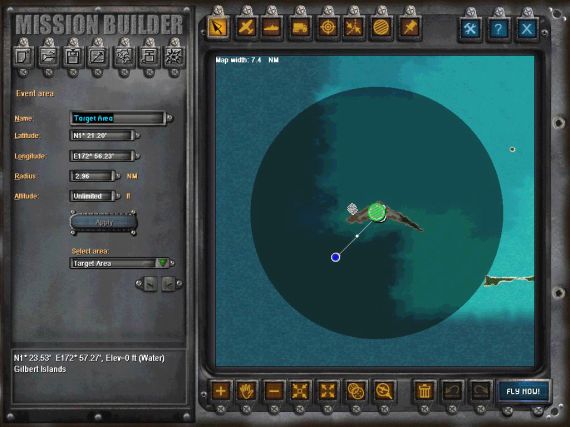
Enemy Planes and Waypoints Left click on the plane icon to select it. Go to the ‘Route’ tab on the left side of the screen. If your cursor was right on the plane when you clicked, it will be showing waypoint #1. If it doesn’t, use the left and right arrows to get to waypoint #1. For ‘Action’ at waypoint #1 select ‘Take off’. Move to waypoint #2. Set the action as ‘Intercept all’ and the altitude to 1500 feet. Move to waypoint #3 and set the action to ‘Land at base’. Setting the Event Area Click on the minus (-) sign one time to back out a little farther. Click on the ‘New event area’ button on the tool bar. This is the button that looks like a circle with diagonal lines running through it. Place your cursor directly on top of the Zero plane icon and left click. Holding the left mouse button down, drag the cursor downward. Notice that as you do this, a circle appears on your screen and grows larger or smaller depending on whether you are sliding your cursor up or down. Also note that at the bottom of the ‘Event area’ panel the size of your area is displayed as you drag. Adjust the size of the event area until it is 3 miles in radius then release the mouse button. The event area panel has a place for the name of the area. Type in ‘Target Area ‘ as the name. This panel also shows the exact longitude and latitude of the event area along with the size of the area. If you missed getting it right on 3 miles dragging your cursor, you can type in the exact radius here. Finally, click on ‘Apply’ to add the name and correct the area radius. After plotting the Zero’s waypoints and setting the event area your
screen should look like this: |
 |
|
Setting the Player Waypoints
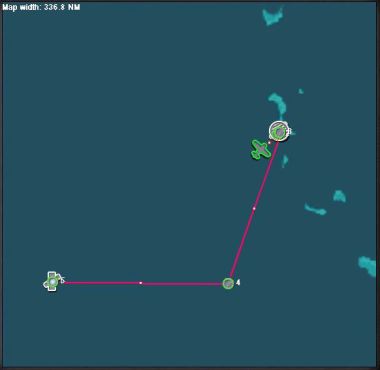
Now let’s set the waypoints for your plane. Zoom out two clicks. That should bring your plane into view. Right click to clear the zoom feature then left click on your plane to highlight it. For your plane select the ‘F4F-4 Wildcat’, ‘Nationality’ is ‘USA’, ‘Mission’ will be ‘Strike’, for ‘Unit ID’ select any callsign you like. The ‘Payload’ will be ‘Bombs Light’, ‘# of aircraft’ equals ‘3’ and the ‘Formation’ should be ‘Fingertip’. Set the ‘Skill’ level as ‘Veteran’ and the ‘Aggressiveness’ as ‘High’. This is the skill level and aggressiveness of your wingmen. Your own ability determines your levels in these areas. For this mission we want good wingmen flying with us. Place your cursor on top of your plane then holding the left mouse button down; drag your plane over toward the lower left-hand corner of the map. We will approach from the Southwest. Now with the cursor on top of your plane, right click. This brings up a pop-up window. Select ‘Insert’ and a dot for waypoint #2 will appear. Drag waypoint #2 to the edge of the Combat Area. Right click on it and insert waypoint #3. Move it to the center of the island. Don’t worry about exact location, we’ll fine-tune it later. Insert a fourth waypoint. Before you move it anywhere click the ‘Maximum zoom out’ button along the bottom row. Click the ‘Pan’ button and slowly move the map over to the right until Ocean Island comes into view. Now drag waypoint #4 down toward the center bottom of the map about the same elevation as Ocean Island. Then insert waypoint #5 and drag it to Ocean Island. Your map should look like this illustration: |
|
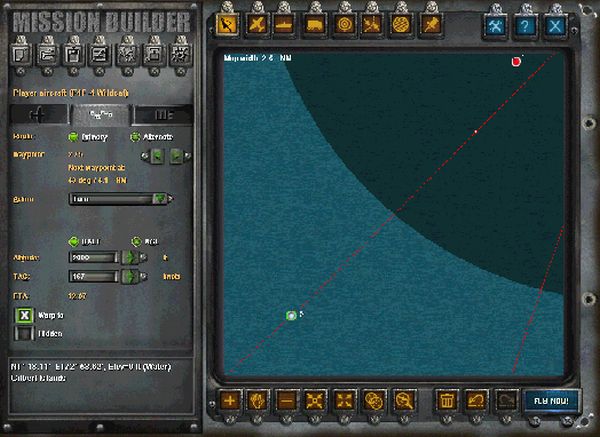
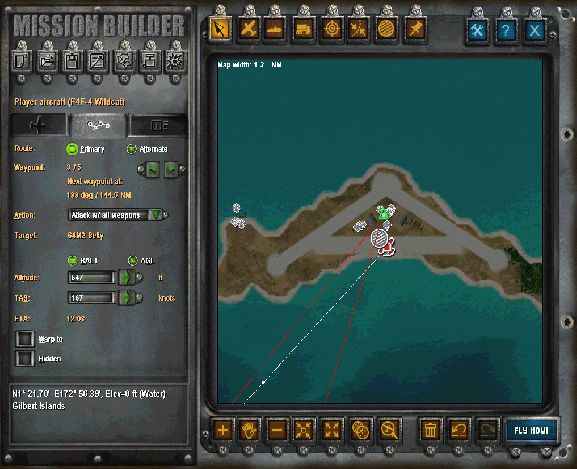
Now let’s fine-tune the waypoints. Click on your plane (waypoint #1). Then go to the ‘Route’ tab over on the left. Leave the action as ‘Turn’ but change the elevation to 2000 feet. Click the right arrow and go to waypoint #2. You need to zoom in very close to fine tune this waypoint. Keep zooming in until the map width is at 2.6 miles. Adjust waypoint #2 until it is between a mile and a mile and a half outside of the Target Area. After you get it positioned just right, click on waypoint #2 again and set the elevation to 2000 feet. Click on the ‘Warp to’ button. Stay zoomed in and move to waypoint #3. You may want to zoom in one more click. Move waypoint #3 directly over where the Betty’s are parked. For ‘Action’ select either ‘Attack with bombs’ or ‘Attack with all weapons’. As soon as you select this a ‘Target’ line will pop up and it should say ‘G4M2 Betty’. If it doesn’t your waypoint isn’t directly over the bombers. Move it around until the target shows as the Bettys. Leave the altitude at the default setting and DO NOT click the ‘Warp to’ box. See the illustrations. |
Waypoint #2 above, waypoint #3 below
|
